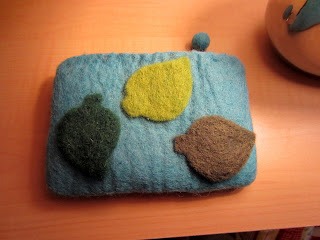
I recently discovered the craft of needle felting. I suppose it's not much of a stretch from knit and crochet, but honestly, I didn't know what it was until a few weeks ago! I was digging around on the internet looking for something else entirely when I ran across instructions and a pattern.
Here, then, is my first project: the Falling Leaves I-Pod Cozy
How does this work? At least the way that I've done my projects, I bought a felted craft that was already complete. In this case, it's a little bag that's the right size to hold an I-pod. It came totally complete, even including a zipper and a lining! While I'd imagine it's possible to use this technique on something you made and felted yourself, that will have to be the focus of a post on another day!
So, my cozy was this beautiful shade of light blue. When I brought it home, it was completely plain (having been marketed for the purpose of needle felting). I don't know whether it would be possible to do this with any felted material you found, because I'm not sure whether there are chemicals added to some types of felt. I also picked up some pre-cut leaf designs. These also were marketed for needle felting, and I'm not sure whether it's possible to use something else. In the photo above, I have pinned them on to the pouch.
This photo gives you a better look at the felt shapes, and also a look at the needle. I bought a "Needle Felting Kit" which included two needles like this one along with a Styrofoam block. For this project, the block goes inside the pouch. Then, you drive the needle into the shapes over and over and over again. The instructions say it's important to make sure to keep the needle at a right angle to the fabric, and I did my best about that. You literally just shove the needle in there over and over and over again. It's a bit repetitive and can make your arm tired. After enough times having the needle pushed through, the shapes begin to bind to the felt base. If you do this, I recommend checking your progress by pulling gently at the shapes to see if they've bound and which areas need more attention. The block goes into the pouch to prevent damage to the table (or your lap) and to make sure that as you felt the shapes to the exterior that doesn't result in felting the two sides together. When you've securely attached your shapes to the outside, you'll notice some fuzzies inside the lining. Don't worry, it means you've done a good job!
Here are some shots of the finished product:
The shapes, depending on the thickness of the felt from which they were cut, will likely still stick up above the surface fabric. But, they're attached on there securely enough that I think you can toss this in your bag and take your I-pod to go!
Here's a shot of the other side! I made this project with one of my college roommates in mind, who simply loves the color blue. I hope that she enjoyed it, since I sent it off to her as a birthday present just a couple of days after her birthday. I also included this in the package:
This hat is knit in a yarn called Bernat Mosaic, which is a self-striping yarn. The color is called Optimistic, and this hat was made with leftovers from the scarf I made her for Christmas. I know it doesn't actually go with the needle felted pouch (or within the heading of this post, probably), but I still wanted to share it with her and with you!


No comments:
Post a Comment