but I decided to join Bloglovin'! I had my surgery as scheduled and everything went really smoothly. I'm still recuperating, which has given me the chance to find lots of new, interesting blogs to read. The more blogs I'm trying to keep up with, the more I got annoyed with reading them in Blogger. So, here I am: on bloglovin!
Follow my blog with Bloglovin

Monday, July 29, 2013
Tuesday, July 9, 2013
It seems to be about that time...
It seems that the time has come for me to take another blogging break. If you've been around here for a while, you know that I've had some serious health issues that have weighed me down. In April, in consultation with my neurosurgeon, I decided that the time was right for me to have my second (and hopefully final) round of brain surgery which might just resolve things for good! In late May, I was disappointed when I learned, almost by accident, that my surgery scheduled for June 18 had been cancelled. After some more negotiating the schedules of the surgeon and the other two docs, the surgery was rescheduled. The date? Today, July 9.
In advance of surgery, especially after I finished up another lingering project I'll have to share with you later, I decided to knit myself a hat. I started here:
 Does this yarn look familiar to you? I actually already used most of it to make a hat and scarf for Ginny, which you can read about here. I used the same pattern and made it almost exactly the same way. This time, I used a total of 7 needles - six to carry the stitches and a seventh to actually knit with. It's a little bit of a pain to knit with so many needles, but I dropped fewer stitches than last time, so it was all worth it. Also, lessons learned: it's pretty darn difficult to travel with a knitted project on so many needles. And, because there seem to be points everywhere, it's easiest to knit sitting at a table. That way, your work's weight is on the table and the points are jabbing the placemat rather than your lap. Duly noted.
 And here's the finished product! It's actually a pretty short little hat - it barely covers the tops of my ears even when pulled all the way down. I can easily tuck it behind my ears, which is a bit more comfortable. All of that would be weird for a winter hat, but I think it should work out perfectly since I'll only wear this hat while my incision is too icky to go out in public bare - that should be a period of just a couple of weeks. In July nonetheless!
So, with that, it's time for me to sign off for now. As I write this post, I'm very nervous surgery is going to wind up cancelled. If that should happen, I'll be back soon with more posts for you! I know my fears about cancellation are somewhat overblown. Unfortunately, it's happened to me enough times that I just can't banish those thoughts. All of that said, I have to expect that I'll have surgery as scheduled and that it will be several weeks before I have more good stuff to share with you. I hope you'll be back once I can write again! I'll miss you!
In advance of surgery, especially after I finished up another lingering project I'll have to share with you later, I decided to knit myself a hat. I started here:


So, with that, it's time for me to sign off for now. As I write this post, I'm very nervous surgery is going to wind up cancelled. If that should happen, I'll be back soon with more posts for you! I know my fears about cancellation are somewhat overblown. Unfortunately, it's happened to me enough times that I just can't banish those thoughts. All of that said, I have to expect that I'll have surgery as scheduled and that it will be several weeks before I have more good stuff to share with you. I hope you'll be back once I can write again! I'll miss you!
Monday, July 8, 2013
15
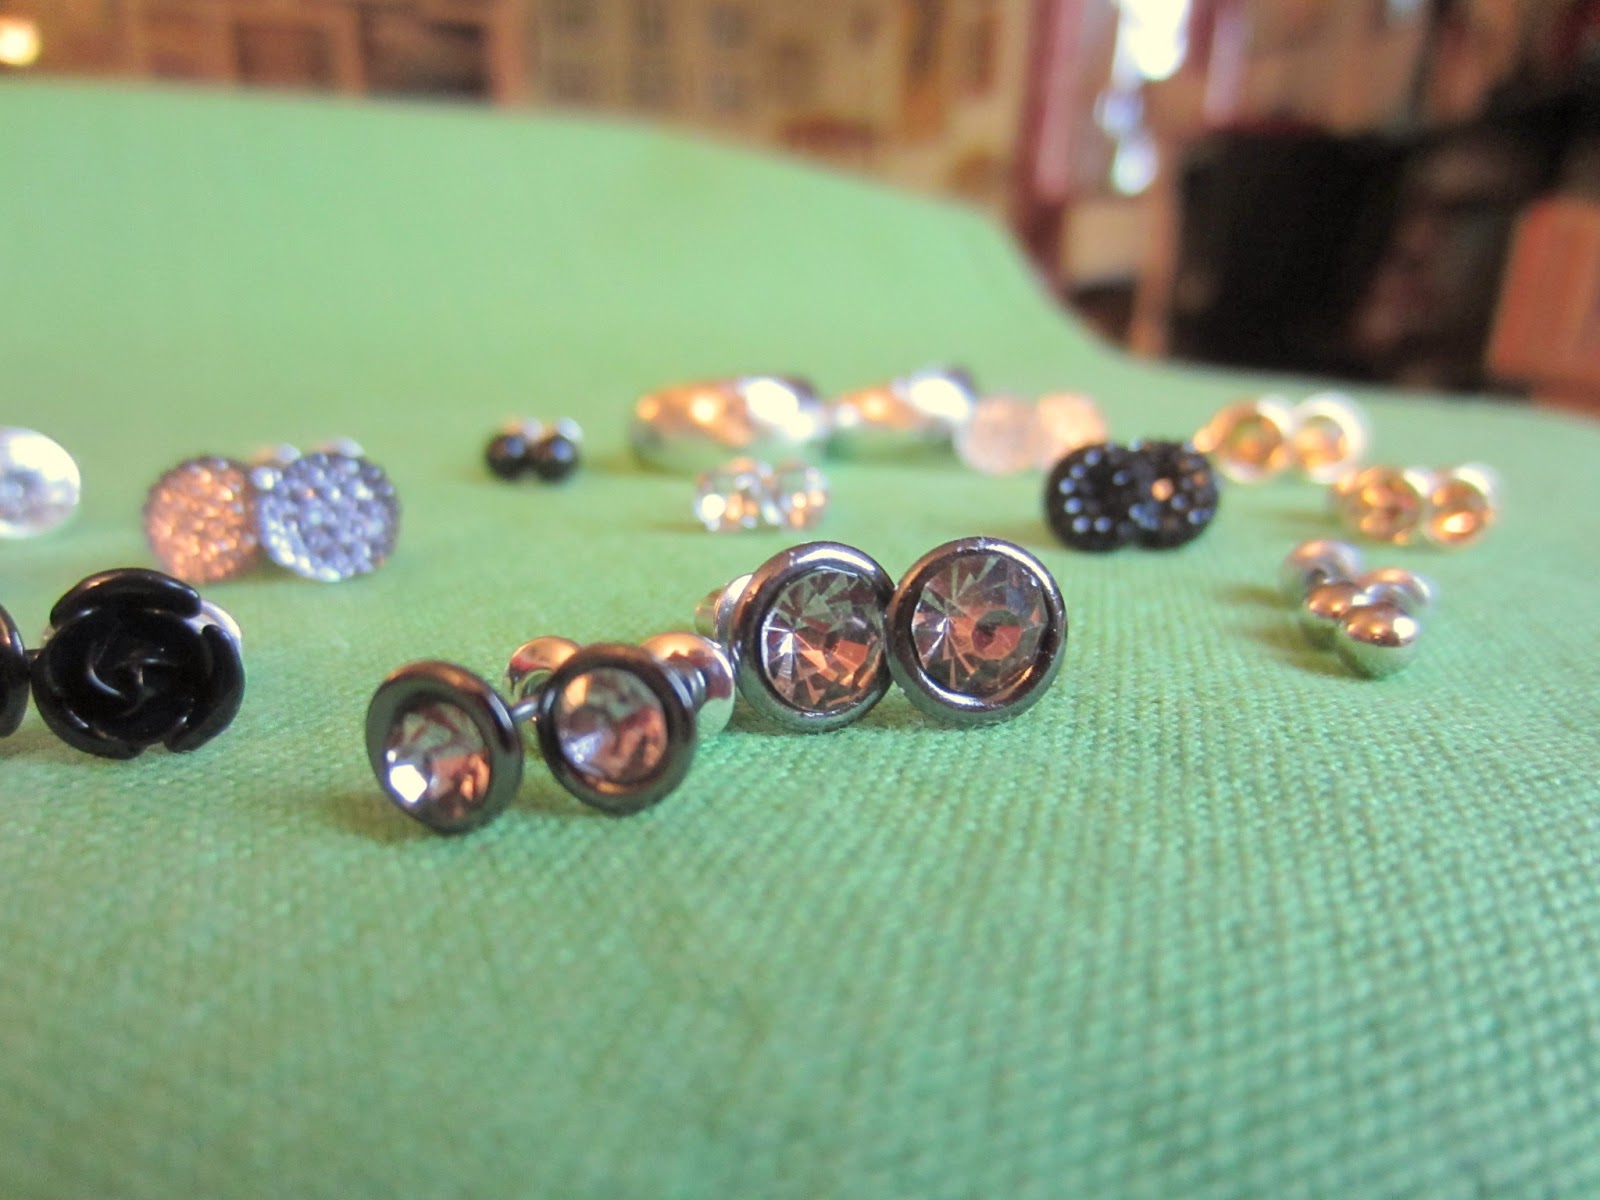
In the last few weeks, I bought 15 new pairs of earrings. I'm always look for small stud earrings to wear to work - they've got to be little since I spend so much time on the phone. Recently, I've been on a bender to add new ones to the collection.


 So here's the full complement of the silver earrings...

 And then I started having fun with the camera. Nice work, Canon non-DSLR. You're kicking butt!
 Yay for focusing!
 Finally, the secret to this madness. Yes, these 15 pairs of cute studs that match my work clothes were had at good ol' Walmart for less than $10.00 including tax. I know they're not the most beautiful or highest quality earrings in the world. But, if one pair goes missing or falls apart, no biggie! That's actually how I wound up in this earring buying craze - I'd had a rotation of 10 pairs or so previously that just sort of deteriorated over time. Now, my collection has been refreshed and ready to go!

These simple ones really got the madness started. I'm awfully tempted to wear them every day...

Don't forget the bigger ones!

And these are so cool! They remind me of the surface of a golf ball. They look round, though they're actually flat!

Check out these little flowers! With my (mostly black) work wardrobe, they some how look less Goth Princess...


Joined by the gold ones as well.


Friday, July 5, 2013
Fresh Flowers
Yeah... not really. I freshened up recently with some flowers. Not actual flowers, but flowers nonetheless.
I have a bulletin board in my bedroom.
 It used to look like this. This bulletin was one of the very first pieces of decor I bought when I moved into my first apartment in 2006. I painted the frame white back then and covered the cork with scrapbook paper.
 This is a close-up of the paper I chose. I like it, but, after 7 years, I was pretty tired of it.
Recently, while shopping at Patina, I stumbled upon this cute wrapping paper. It was more than I'd usually spend for something to wrap gifts, but for decor? Yes please.
 So cute! This paper is actually relatively small scale, even though it doesn't look that way in the photo. Notice on the bottom left that there's a staple. It's just standard sized, so hopefully that gives you a sense of the scale.
In order to remove the light pink paper, I had to remove all of the cards, tickets and other little pieces of art. Once I replaced the backdrop, I replaced a lot of it, removing some stuff and adding other stuff.
Then, all I had to do was slip it back onto its hooks. Easy peasy!
 And here's the side angle:
 It's a view of some fresh flowers right from my bed!
I have a bulletin board in my bedroom.


Recently, while shopping at Patina, I stumbled upon this cute wrapping paper. It was more than I'd usually spend for something to wrap gifts, but for decor? Yes please.

In order to remove the light pink paper, I had to remove all of the cards, tickets and other little pieces of art. Once I replaced the backdrop, I replaced a lot of it, removing some stuff and adding other stuff.
Then, all I had to do was slip it back onto its hooks. Easy peasy!


Wednesday, July 3, 2013
Plus
So, a few weeks ago, I bought this...
 YAY! I already had a Nook Simple Touch but I decided I was ready to upgrade: internet please!
 And this is what it looked like. It's pretty darn awkward to take a picture of something with such a shiny screen, but you get the basic idea.
 It worked pretty well, and I was happy. I originally had the idea that having a tablet was going to completely change my life. Spoiler alert: It didn't. It's really very cool, but it didn't live up to the hype (that I produced in my own head.)
 Then, after I'd had the nook for less than 48 hours, I noticed a problem. Weird with the frame, right?
 I know this picture sucks, but it helps me show what made me realize it was pretty serious. I mean, the frame separated so far you can see light passing through? No thanks. I was able to successfully push down on the frame so it seemed flush with the screen, but before long, it would tend to pop up and separate again. So then I took it back and they gave me a new one.
 And it works great. You can see in this picture that the top right corner of the frame is flush with the top right corner of the screen. SCORE!

 There's my blog! And the proof is in the pudding - no flash player, but that's okay. It's still very cool.
 After I'd had it for a few days, I decided that the snap on screen cover just wasn't enough. I wanted to be able to shove the tablet in my bag and go. Basically, I wanted to be able to have it with me wherever. It's a little smaller than an I-Pad so finding a sleeve that was the right size was a bit of a challenge. I got this really cute one, which is for a 9-10" tablet, is made by Built NY and cost about $25. Not bad. And how cute do they look together, right? Have tablet, will travel. Hooray!


So, I slid the new one into its snap-on case and it works great. This case is actually a bit like the original folding screen cover for the I-Pad. The design on that one is a little better - this one can be a bit clunky. But the important part is that when the screen cover folds back, you can use it to make a little stand so the device can support itself at a comfortable angle for reading or watching videos.


Monday, July 1, 2013
Heart of the North
It seems like, every time I see photos online of someone's house, I get jealous of the great state art they've got hanging on the walls! Super jealous! I love my home state quite a lot, so I decided I needed to have some state art of my own. I hate to admit it, but I'm a little leery about buying art over the internet - which I know is where lots of this stuff comes from - so I decided to make my own.
 I found a map of the state of Minnesota on the internet. I downloaded the picture and copied it into a Word document, where I was able to do the size adjusting I needed. I wanted it to be just as big as possible to be printed on an 8.5 x 11 inch piece of paper. I used an X-Acto knife and my Creative Memories cutting mat.
 I bought a canvas and painted it this light blue color. I mixed it up with some bright turquoise paint and white. I considered adding some water to get the wash effect you see above, but it actually got that way because I had barely enough paint to do the job.
 My next step was to make my stencil. I used masking tape to attach the paper cut-out above to some Contact paper and then I traced it a second time. I then had a perfectly clear sticker of the State of Minnesota, which I applied to the canvas. Once neat thing was that it was adjustable, so I was able to make sure it was centered in both dimensions. And now, here it is, ready to go!
 I grabbed my navy blue paint and went crazy! You can see I'm using my crafting tablecloth, which was smeared with paint.
 When the navy was dry, I pulled off the stencil. I was a bit nervous it was going to be hopelessly stuck on, that it would come up in pieces or have to be scraped off. But no! I pulled it off in one piece and couldn't bring myself to toss is because it was so neatly preserved.
 So, here it is! It turned out almost exactly as I'd dreamed it would!
 I used a heart shaped paper punch and some glittery red scrapbook paper to make hearts for special places. I know sometimes when you order art like this online, you can make a request about where a heart should be placed or something like that. But, as I got to thinking about what I wanted mine to look like, I realized I was going to need hearts all over the place.
 I also wanted to put labels on all of the places, which I made literally by printing out the names from a Word document on regular printer paper. It was a little bit of a pain to get all that stuff stuck down with a scrapbooking glue stick. I then covered it all with a coat of Mod-Podge just to make sure everything was good and stuck down.
 Voila! You might be wondering about the words at the bottom. For those of you who didn't know, the motto of the State of Minnesota is "L'Etoile du Nord" which means "The Star of the North" in French. Minnesota is the only state in the U.S. whose motto is in French, and since I speak French and I live here I think its pretty darn special. I thought about just using the regular motto - perhaps with a star-shaped emblem - for this piece. But, the more I thought about it, the more I realized I really wanted to show it as "heart," because it's home. I used glittery letter stickers for the words since I don't love my handwriting and I don't have the fine motor skills to paint letters.
 I enjoy the little bit of shiny-ness on those hearts!
 With a little bit of adjusting and measuring, and one new nail hole, this piece joined the gallery wall in my living room. If you want state art in your place, get off the stick. It was so easy!


Subscribe to:
Posts (Atom)