Wednesday, June 4, 2014

Felt Flower Wreath

Hi everyone! I'm checking in today with another project I completed not long ago. Some of you who know me in person might be aware of this already: my birthday is smack dab in the middle of "birthday season" - lots of other people close to me have birthdays within just a few days of mine. So, while I always look forward to celebrating my birthday by taking it easy, I'm also usually engaged in some madness getting ready for all of the other birthdays in my circle. This year, I decided to make a gift for my closest co-worker, whose birthday is just two days before mine.

I knew I wanted to make a wreath.
There's a place in her office where she attached a command hook to hold a wreath at Christmas time. When that season ended, I attempted to remove the hook, but it seemed stubbornly stuck on (there's this gnarly textured wallpaper behind it - ick). Rather than risking damage to the wall, we decided to leave the hook in place. I knew it would be the perfect spot to display a wreath year round, so I was quickly set on that as my project idea.

I wasn't keen on using faux flowers, so I did some googling to see what my choices were. It didn't take long for me to settle on making rosettes out of felt.
 Alright, twelve sheets of felt later, I was in business. The total cost in supplies for this project was definitely less than $10, as the wreath above wasn't even $5 (though I think it was on sale, or I might have used a coupon).

And here's my first rosette! My online research turned up lots of blog posts with instructions for how to make these flowers - I won't bore you with another one. Basically, you cut the felt into a spiral and then roll it back up. What I can tell you is this: you might see instructions encouraging you to trace a spiral onto your felt, or at least, cut out a circle before free handing your spiral. I didn't do either. I cut each felt sheet into squares and then cut the spiral just using my eyes and a pair of fabric scissors.

I was pretty pleased with the result. There are a couple of these that I made by zig-zagging within the spiral - a tip I read about somewhere. I wasn't actually all that happy with their appearance, though they provided a bit of a contrasting texture.

So, I just kept on going! The only minor casualty was a burn from my hot glue gun. We'll call that beginner's misfortune, as this was my first big project with the glue gun.

The next step was to glue the rosettes onto the wreath, which was really quite fun!

Ta-da! The final product. When I originally imagined this project, I was thinking I was going to scatter the flowers all over the wreath, with only a few clumped together in the lower left corner. But, as I was putting the clump together, it didn't look quite full enough, until it began to look like this. I think this is a little more mod than I had originally planned, but I was happy and so was the birthday girl!

Thursday, May 22, 2014

Spice Pencil Cup

Back in February, I went to Duluth for a long weekend with my friends. I brought home this lovely little package from the antique shop... 

What's inside? 
 Why this, of course! A container of Allspice, bought at the antique store. Sounds yummy, right?

 Okay, so maybe not so yummy.

But, I got very lucky. A few minutes with a pair of pliers easily removed the sliding mechanism that used to fill the hole on the top of the tin. I was able to dump most of the Allspice directly into the trash can, and a quick rinse took care of any lingering dust and odor. I bought the tin with this particular project in mind. They had another one in the same collection that held Celery Salt. I have NO idea what that would be used for, or what it smells like, so I decided to play it safe and go with Allspice. When I opened the tin, I noticed that the smell was pretty weak. If I hold the tin right up to my nose, I get a whiff of it sometimes. In short, my fears of celery salt might have been overblown, but I'm happy with the Allspice!

 I then looked carefully around my apartment until I found the other supply required for this project. Do you know what these are? They're the magnets on the back of magnetic notepads. I always have one hanging on my refrigerator, which I use for making grocery lists. When the paper is gone, all that's left is the magnet. I hung onto these ones just waiting for a chance to put them to good use. It's here!

 I picked off as much of the paper as I could, though I didn't do a perfect job. I then cut the magnets to make sure they were the right size. This is my test run! All that was left was to heat up the glue gun and gob some of it on there.

 After just a few minutes of drying time, I was ready to roll!

It blends in just about perfectly, doesn't it! Keep your eyes peeled for a pretty old spice tin next time you're out antiquing. This project is SO cheap and easy - you could have one of these pencil cups in your kitchen any day now! 

Tuesday, May 20, 2014

The Big One

Hi guys! One of the things I was doing during my recent blogging hiatus was celebrating a big one - a milestone birthday, that is! 
Yep. The Big 3-0! I got the chance to celebrate my birthday with my best friends on the last day of my twenties.I enjoyed these awesome balloons, in my signature color combo...

I received a bunch of very thoughtful presents and cards from friends near and far away. So lucky! 

Ginny and family threw me a lovely party, complete with cupcakes holding 30 candles. 

I couldn't quite get through all of them at once! All in all, it was a very happy birthday - the smoke detector didn't even go off. Welcome to 30! 

Friday, May 16, 2014

The slump is over!

Thanks for hanging in there as I've shared with you the most disastrous story of a DIY project ever told. The end is in sight!

I decided to use a technique on a regular canvas rather than a burlap canvas.

I realized I wanted to try to make it canvas textured, like the project Tasha did here. I used a hybrid of her technique and Carrie's technique.

I painted the edges black to start with, but then used a second canvas (rather than a foam roller as Carrie suggests) to get the texture. It was also while I was reading Carrie's post that I became nervous that my project might wrinkle or bubble, since I would be using scrapbook paper rather than an actual photograph.
Sure enough. Here are the wrinkles.

I ripped the paper off once it was mostly dry and was left with this mess. I was quite tempted to junk the whole thing, but my persevering nature took over instead.

The canvas and I spent some quality time with a Norwex cloth and a glass of water. That took care of most of the paper remnants, but I had to bring in the big guns for the really stuck areas: sandpaper. With just a bit of elbow grease, I found that the canvas was smooth enough to reuse.

There might have been something left in the Omni-Gel bottle...
But, I gleefully threw the whole, gooey bottle right into the trash. Goodbye forever, Omni-Gel. We are never, ever getting back together.

After I experienced the wrinkling problem, I got myself over to Google and did some research. I ran across this page, suggesting that I was going to need to get some acrylic spray and coat both sides of the paper with it. There were a few reasons I was NOT excited about that: the most important reason was that I was actually completing the project on what was essentially a "snow day." I didn't want to drive to Michaels (or spend more money), and I had no good place to do the spraying. I wasn't about to go outside and spray the paper in the snow, and I didn't want to try to do it in my apartment and open the windows. (This snow day issue was also part of why I was so desperate to reuse the canvas. For those readers who are not Minnesotan, please keep in mind that this "snow day" was occurring in April.  Love it.)

So, I did a little more digging and ran across Kristi's video tutorial. I was already familiar with Kristi, as I've been following her blog for quite some time - not long enough to have caught this decoupage tutorial unfortunately. But, long enough to know that she would be truthful about whether something was easy and whether it worked. Sold!

So far, so good. No wrinkling! 

I couldn't believe it. I actually got to move on to the next steps. I trimmed the edges with an X-Acto knife, and then painted over the edge with more of the black paint, in hopes of making it less obvious that this was a piece of paper glued onto the canvas. 

FINALLY! 

And, I'm a little embarrassed, but also a little proud, that this picture even exists. I'll let it speak for itself: 
And thus ends the slump! I look forward to returning to our regular programming around here shortly! 

Wednesday, May 14, 2014

Slump, part 3

So, what did you think of that orange paper trick? Pretty neat, huh?

Not really. I worked my good ol' Norwex cloths to the bone. But, even though the sample on the red paper had worked out really smoothly, this orange paper was a completely different story. Seriously. I scrubbed and scrubbed. And orange it was.

I decided I needed to change my approach. If you guessed that this blue contraption is one side of a fingernail buffing block, you're right on the money! I decided not to go all the way to sand paper, but I knew we needed something more abrasive to make progress here.

I guess you could characterize this as progress in the wrong direction. Remember how I really wasn't going for the distressed look? I meant it!

Okay. So I was basically back to square one here. I had two canvases that were ruined. I had one orange decal that I didn't need to apply to a canvas to know it wasn't going to work. I decided that I'd been far enough down the road that I must have learned something. I elected to just start back at the beginning, using the technique mentioned on the bottle, along with the Norwex cloths to aid in the paper removal.

I worked on removing the paper during the course of several different days. I knew I'd been sort of impatient to get this project done earlier, since I'd had the birthday party as a dreamed deadline. This was happening at the end of March, so the deadline was long since blown. I deliberately took my time, probably attempting to remove the paper 6 different times, over the course of a couple of weeks.

You have GOT to be kidding me!

WHY WON'T THIS WORK?

I wailed internally for a long time about this. I realized that Omni-Gel and I were done. For good. But, I did find a different way to complete this project. Stay tuned until next time for the conclusion of the Slump story!

Monday, May 12, 2014

Slump, part 2

So when we last talked, you saw that my project looked ugly, even after it dried. I was disappointed, but I'd already made the decal twice and figured I could do it a third time without too much trouble. That big bottle of Omni-Gel has enough to get you pretty far. All I had to do was remove the attached decal from the burlap canvas...

[insert record scratch sound effect here].

Yikes.

Maybe you were thinking there wasn't anything I could do to the first draft of this project to make it look uglier. You were wrong. It quickly became clear that reusing the same canvas wasn't an option.

Back to JoAnn I went, to pick up another canvas. They were cheap, so I wasn't worried about the expense, though I was coming down to the wire on Ginny's birthday party, which was held on February 1. I wound up having to just let go of the dream and plan to give it to her after the fact. Getting ready for the party took top priority!

So, back to the drawing board I went. I printed and prepared a new decal. I decided to change my approach a little bit this time by using a Norwex cloth to try to remove even more of the paper. I assumed that the white areas on the first draft were that way because there was paper residue left behind. So, with the Norwex cloths, I gave the back of the decal a good scrub.

Here's draft two, all ready for application!
Look how pretty - and clear - the decal is! Ready for action!

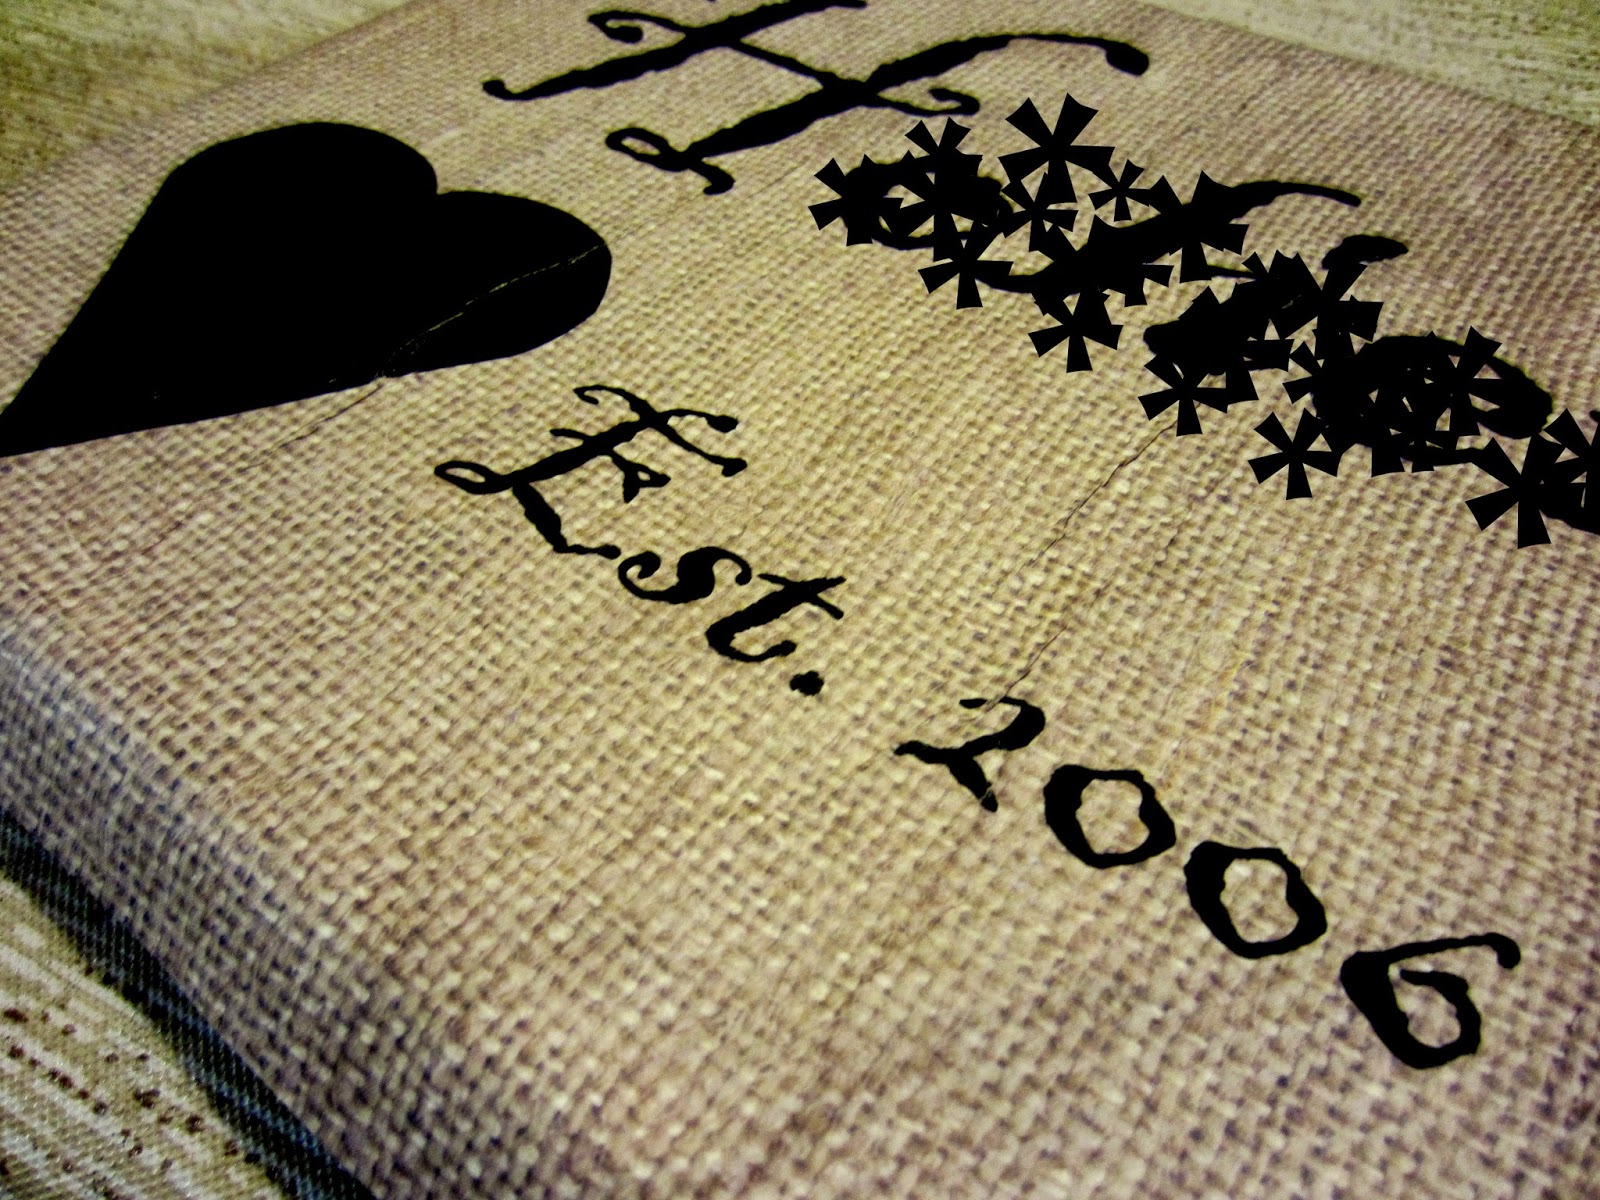
Or not. This is the second draft - just the corner. Sorry for the weird glare. but you get the idea. Despite all of my hard work to remove the paper, it just didn't look right. I didn't get it all. And those blue areas? Not a clue.

I was feeling pretty hopeless when I had a sudden brainstorm. It was difficult to remove all of the paper because it was hard to see the tiny little bits. But, if the paper were colored, it would be easier to see!

I decided to check that theory with an experiment, on a smaller scale. I nabbed a piece of red paper and got to work!

The red paper rubbed off easily, though I did use the Norwex clothes to check my work. I've got permanent red stains to prove it!

With the paper gone and the decal dry, I laid it on top of some white paper to check for any red paper remnants. You might see a tiny bit of a pinkish tinge, and I'll admit that there was one. But, I also reminded myself that the adhesive Omni-Gel layer was supposed to help the whole thing dry clear. And I also reminded myself that the background I was going for actually wasn't white - it was burlap. Not having a burlap-colored piece of paper lying around, I went for the next best thing.

I tested it out on the burlap canvas - and thought things looked A-Okay!

Then I glued it to this blue paper. And I thought things were looking pretty good!

So, back I went to the computer, where I printed out my design on orange paper.

So, I soaked the decal in the water before trying to remove the paper...

and that's where I leave you for today! Will orange paper be the answer? Stay tuned to find out!

Friday, May 9, 2014

Where have I been?

Anyone who saw a blog post from me yesterday might have been a little surprised. Rightly so. It's been exactly a month since I last did a post. Where have I been all your life? I'm not entirely sure. Doing my thing, apparently. I've had some behind-the-scenes stuff going on - along with a cold and a stomach bug. But, by some miraculous confluence of circumstances, I've found myself with a little bit of time to blog recently. Hooray! I'll be sharing what I can, when I can.

Like right now - I recently cooked a new recipe. It went pretty well!
I made Paleo Sloppy Joes! In general, sloppy joe is basically a Paleo choice as long as you don't put it on a bun. I'm a little skittish about it, though, because I worry that the pre-prepared stuff has a lot of salt in it. Also, if you use a recipe that calls for ketchup, it's probably got some added sugar (in addition to some salt). Eek!

So, I slightly modified this recipe. I used probably half as much onion as called for, chopped just about as small as I could make it by hand. I'm normally reluctant to cook with onions - I had a terrible experience the first time I cut up an onion. I cried and cried, and then wiped my eyes, and then they started burning. It was awful. I recently read two different tips, which I employed quite successfully. One is to avoid cutting into the "root end" of the onion until the very end, because that's where most of the sulfur compounds are located. I didn't use the entire onion, so I didn't cut into the root end at all. Also, I read a tip that suggested that the compounds wouldn't affect your eyes if you had water in your mouth. Sounds weird, but worth a try. I took a drink of water and didn't swallow. I had to do this twice during my cutting adventure, but it was definitely worth it. I was tear free!

I also used Hickory flavored Liquid Smoke - apparently Mesquite would have been the other choice, but I selected almost randomly. My biggest modification was to delete the beef broth from the recipe. Some hardcore Paleo types have homemade beef stock lying around. Not yours truly. I could've bought the canned stuff, though that would have totally negated my lower-salt goal. I was intending to sub water, though I didn't find it needed much. I had my measuring pitcher at the ready filled precisely to the 1/2 cup mark, and used less than half that amount, added in dribs and drabs as the concoction looked too thick.

After letting it meld together for a good 5 minutes, I began preparing a sweet potato to serve it over. With 7 minutes in the microwave and another 10 in the toaster oven, while the sloppy joes simmered on the stovetop, we were in business. Yum!

I'll be back on Monday with the next installment in the story of the slump!

Thursday, May 8, 2014

The slump

So, one of the things I've been up to behind the scenes lately is working on a whopper of a craft project. You don't see too many DIY-fails around here. That's because usually, if I've committed to doing it, I've got some good ideas about how to make it happen. When there's a fail, I show it to you. You might have thought those Christmas Ornaments late last year were bad... well what I'm about to show you was a whole lot worse!

It started with this: 
Sorry for the asterisks - I want to respect Ginny's privacy as I so militantly protect my own! 

This photo was taken on January 26, 2014.  Ginny's birthday was approaching, and I decided I wanted to make a craft to give her as a present. I've always thought it's cute for a family to have something in their house that says their last name and then "Established ____," with the year the parents got married. I had wanted to make something like that for Ginny for quite some time and thought this birthday (her 30th!) would be a perfect chance to do it. I hate my handwriting, almost as much as I hate to read the writing I do with a paintbrush. I knew I needed to think outside the box.

Some internet research turned up Omni-Gel. Have you heard of this stuff? You can print a document off your computer using a laser printer, and then cover it with three coats of Omni-Gel to make a decal. Sounded sweet to me! I designed the art on the computer, printed it off on a plain piece of 8.5 x 11 copy paper and got to work. 

There was a reason I had my cake pan hanging out in the picture above. Once you've brushed on three coats of Omni-Gel (one horizontal, one vertical, one diagonal), you've got to get rid of the paper. Once its good and wet, the paper should just rub off the back. 

And that was basically what happened. Or so I thought. It was white paper, and I tried hard to remove as much of it as I could. At this point, I thought I was done. The Omni-Gel bottle mentions that the decal might look "milky" but will dry clear. 

I figured that it looked clear enough once it was dry, but I was worried. It wasn't quite perfect. If you'll notice in all of the photos above, there's a bit of a line in the middle of the heart. At first, I thought I'd leave it like that for some kind of contrived-distressed look. But. as the days went by, I began to realize it just looked sloppy. So, I actually shook my printer's toner cartridge and then printed a second draft. Three coats of Omni-Gel later, followed by some paper removal, I was back on track. 

I let the decal dry, which I think was probably the right decision. I even used an old textbook to flatten it because it had gotten a little curled. Next up? Application! 

It was actually stumbling upon this burlap canvas at JoAnn that inspired this whole project. Nothing says Ginny quite like a stretched burlap canvas. Once I removed the wrapping, I followed Omni-Gel's instructions for application: wet the surface, and the back of the decal, with Omni-Gel. Put them together before the Omni-Gel has a chance to dry. 

Holy crap. 

This is not good. 

No, you're not seeing some kind of freaky photo effect. Your screen is fine. It really does have that glowing translucent blue glow in the middle. Yikes. 

Maybe once it dries, it will actually be clear? And not milky, and not blue? 

Nope. 

Stay tuned for more of this crazy story!