

Thursday, April 19, 2012
Spring has Sprung!
And here is the proof:
 Look at this picture of the tree in the front yard at my parents' house. We lovingly refer to it as the "Crap-apple" tree - it's, of course, a CRAB-apple tree. It is fully in bloom and I think that means Spring is here to stay!

Wednesday, April 18, 2012
Cherish frame
As I mentioned here, I had two photos of me with my parents at my cousin's wedding hanging on the wall in my bedroom. Though I'd worked at hard at picking out frames and mats that suited them, I was never quite satisfied with the look. I decided to do something different and realized that what I really wanted was a double frame.
Initially, I planned to get a white double frame and paint it a light green. When I realized I wouldn't be able to find a cheap, double white frame, I began to think about this one:
 This warm wood with red tones is just about a perfect match for my dresser, and it was always my intention to hang this frame just above the dresser. I knew I wanted to dress it up a little bit, so it was time to get creative.
 The little metal word, which reads "Cherish" was the inspiration. I've had that little piece of metal hanging around for ages, as it came with a frame I got around the time I graduated from college. It didn't work on that frame but I figured it would work on this one. I then hit up the scrapbooking section where I found these pink flowers with rhinestones in the middle. The pen-tip bottle of Tacky Glue rounded out the supply list for this project.
Next, I centered the word in the middle of the cross bar and then scattered the flowers in the corners. Ta da!
 I didn't realize until I put the pictures in the frame just how lucky I was that the light green paint idea didn't work out. All of us are dressed in warm colors, and I think this warm wood shade is much more flattering than a minty green would have been.
Here's a shot of the frame in its new home!
 I think it works. A perfect place for pictures of my family!
Initially, I planned to get a white double frame and paint it a light green. When I realized I wouldn't be able to find a cheap, double white frame, I began to think about this one:


Next, I centered the word in the middle of the cross bar and then scattered the flowers in the corners. Ta da!


Tuesday, April 17, 2012
White on White

Silver and White by marvelousminnie featuring pointy nails
Check out this set I made on Polyvore.. Although I love bright colors, recently I've been loving whites and silvers. I love the way the details stand out on these neutrals!
Monday, April 16, 2012
The third time's a charm
As you know, I love to knit. I learned how while studying abroad in Norway when I was an undergrad. I didn't do a whole lot with it until I learned that Ginny was expecting her first baby when I was in my first year of graduate school. The first "big" project that I knit was a baby blanket for Miss I, who recently turned 5. Since then, I've had ebbs and flows, but I've been hooked.
Before I'd ever begun knitting, though, I learned how to crochet. It was all the rage among my friends at St. Olaf during our first and second years. But, when I took up knitting, I didn't keep up with crochet and I lost the skill.
This last Christmas, I asked for, and Santa brought, this book:
 I've noodled around a little bit with a hook and yarn since Christmas and have been surprised by how easily it has come back - especially since I gave up on using the hold recommended in the book. Don't get me wrong, if you were learning to crochet for the first time, it makes sense to follow her instructions because you'll get better stitches with less effort. But, given that I have some muscle memory, it was easier to let my instincts take over. Now, I've got my eye on a pattern that's going to have a shape in one color sit on a background of another color. With knitting, the technique you would use to achieve this effect, intarsia, is extraordinarily difficult. The crochet instructions seemed simpler, so I decided to give it a try.
Here's my first attempt, a heart:

You'll notice that the heart looks a little by stylized, with asymmetrical sides. I guess it looks cool, but believe me, this was not the desired effect! I was trying hard to make a heart that was as plain as could be. But, I dropped a bunch of stitches which is why the fabric is wider at the bottom than the top. Although this was frustrating, it wasn't a surprise at all. I've been dropping crochet stitches since 2002!
So, I decided to make another attempt. The shape I'm wanting to make doesn't have any curves to it - it's all straight lines - so I decided to simplify. Part of the challenge with the heart was the changing number of stitches in each color in each row to create the effect. I figured square on square would be super simple.
 Nope. This one still contains a mistake! It's impossible to make a perfectly straight line in crochet. In this example, the right side of the blue box is as close to perfect as you can get. That technique is correct. The mistake is at the upper left corner with that extra v out there. Grrr!
So, I figured the third time had to be the charm. And thankfully, it was!
 This one's perfect! Hooray! I'm off to the races to make a multicolored crochet project. More on that coming soon!
Before I'd ever begun knitting, though, I learned how to crochet. It was all the rage among my friends at St. Olaf during our first and second years. But, when I took up knitting, I didn't keep up with crochet and I lost the skill.
This last Christmas, I asked for, and Santa brought, this book:

Here's my first attempt, a heart:

You'll notice that the heart looks a little by stylized, with asymmetrical sides. I guess it looks cool, but believe me, this was not the desired effect! I was trying hard to make a heart that was as plain as could be. But, I dropped a bunch of stitches which is why the fabric is wider at the bottom than the top. Although this was frustrating, it wasn't a surprise at all. I've been dropping crochet stitches since 2002!
So, I decided to make another attempt. The shape I'm wanting to make doesn't have any curves to it - it's all straight lines - so I decided to simplify. Part of the challenge with the heart was the changing number of stitches in each color in each row to create the effect. I figured square on square would be super simple.

So, I figured the third time had to be the charm. And thankfully, it was!

Friday, April 13, 2012
Quinoa Salad
Here it is, everyone: my first recipe post. I'm really not much of a cook. I like food that's simple to prepare. Here's a recipe for one of my favorites, quinoa salad.
When I was in college, I studied abroad in France during the spring semester of my junior year. I lived with a host family, made up of three daughters who were in high school or college, a dad, and a mom. The mom was originally from Peru. Right after I got there in February, we started eating quinoa as a side dish during meals. For those who haven't tried it, quinoa is a grain that's a bit like a cross between rice and couscous. It's native to the Andes, like my host mom, and is super high in protein. As the weather warmed up that spring, my host mom began making "la salade," which featured quinoa, any veggies that were laying around, and a light dressing. This was one of my very favorite things that I ate while living with my host family, and once I was home and cooking for myself, I decided to replicate it. I'm not really a pasta-salad lover, so I think this is an awesome stand-in!
Here are my instructions for making quinoa salad:
 First, prepare the quinoa according to the package instructions. Typically, that means one cup of grains for two cups of water. Measure carefully, because unlike pasta, you won't be draining the quinoa at the end. Also, make sure to rinse the quinoa before you start. I know some brands advertise that you don't have to rinse it. I don't trust them. As long as you have a mesh strainer, it's super simple to rinse it and you wouldn't want to go to all this trouble and discover that the quinoa has a sour taste! In the photo above, you can see that we have a long way to go!
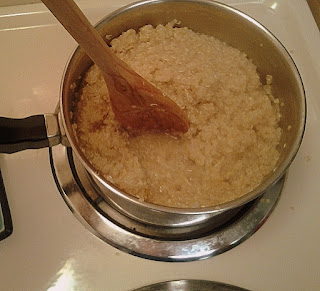 We're making progress, but it's still not quite done! Also, if you make this, use a bigger pan than I did. I think ideally you'd use a 1.5 quart, while I used only a 1 quart. If it's a little bigger pan, you can walk away while the water gets ready to boil. You can also use the cooking time to prepare your other ingredients.
 Alright, the quinoa's done when it looks like this! I recommend that you check it by moving it away from the bottom of the pan. That's the motion I'm making with the spoon in each of these pictures. It's only in the last one that the space I'm creating isn't filled with water. That's how I know it's ready! Once it's done, you'll need it to cool off at least to room temperature. This salad is a great use for left over quinoa, if you have some. If not, you can make the quinoa the day before and chill it in the refrigerator. Or, you can do what I do: as soon as it's done, I transfer the quinoa to a different bowl and take it into the dining room where I leave it for 30 minutes or so, returning occasionally to stir it. If you choose a big enough bowl (like the size you'll need for your finished product), it should be pretty much cool after that half hour.
 Next, get ready to chop your veggies! You can use pretty much whatever vegetables you like and have on hand. My host parents had a vegetable garden and were close with a network of farmers that gave them access to something kind of like a CSA, so they always had tons of vegetables at the house. We ate this salad with any kind of vegetable you can imagine.
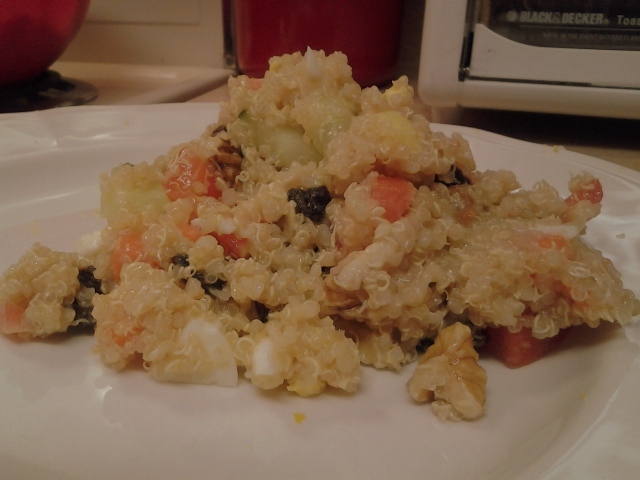
I have a roster of favorite veggies for this dish, and since I don't often have veggies lying around (because spoilage is a serious problem when you live alone), I usually use half a cucumber, 2 carrots, and 2 roma tomatoes. I cut then into bit sized pieces - they don't need to be finely diced up for this recipe. I use raw vegetables because that's most convenient for me, but you could certainly cooked. I would recommend that they be no warmer than room temperature.
 I also use non-vegetable ingredients. My favorite is hard boiled eggs. I had some Easter eggs left over. I also recommend the eggs that come pre-peeled as this simplifies the process if you're in a hurry! I also add walnuts and raisins for a little extra crunch and protein.

So, when all of the mix-ins are ready, I dump them into the bowl with the quinoa. I like to put "wet" ingredients in first, but that might be irrational. The quinoa, veggies and others are in the bowl on the right. On the left, we have the sauce.
One of the reasons I prefer this to your standard pasta salad is that mayonnaise-type dressings make me a little nervous. My host father was required to strictly avoid mayo and other cream-based sauces for health reasons, so there was never any question of using something like that at their house. You can put whatever kind of dressing you want on this salad. I make one using a mixture of olive oil and lemon juice. Once, I found a recipe on the internet that suggested 1/2 a cup of olive oil and 1/3 cup of lemon juice. For me, that was WAY too much lemon juice. I use probably more like 1/2 a cup of olive oil and 1 tbsp of lemon juice, though I'll admit that I don't measure anything and just look at the color when I mix it up in my little white bowl. While I think it's a good idea to mix up the sauce beforehand, if you need to adjust the ratios once it's already mixed with the salad, it's not a big deal. Just add whatever you need more of to the bowl, mix it up, and voila!
 This is the finished product! Yum! You can serve this however you want. I often eat it as the main dish, accompanied by cooked broccoli, or salad, or cornbread. You can also serve it on the side of a piece of meat - I tried it with a piece of summer sausage recently which was delicious, though it likely cancelled out any health benefits. Enjoy!
When I was in college, I studied abroad in France during the spring semester of my junior year. I lived with a host family, made up of three daughters who were in high school or college, a dad, and a mom. The mom was originally from Peru. Right after I got there in February, we started eating quinoa as a side dish during meals. For those who haven't tried it, quinoa is a grain that's a bit like a cross between rice and couscous. It's native to the Andes, like my host mom, and is super high in protein. As the weather warmed up that spring, my host mom began making "la salade," which featured quinoa, any veggies that were laying around, and a light dressing. This was one of my very favorite things that I ate while living with my host family, and once I was home and cooking for myself, I decided to replicate it. I'm not really a pasta-salad lover, so I think this is an awesome stand-in!
Here are my instructions for making quinoa salad:


I have a roster of favorite veggies for this dish, and since I don't often have veggies lying around (because spoilage is a serious problem when you live alone), I usually use half a cucumber, 2 carrots, and 2 roma tomatoes. I cut then into bit sized pieces - they don't need to be finely diced up for this recipe. I use raw vegetables because that's most convenient for me, but you could certainly cooked. I would recommend that they be no warmer than room temperature.


So, when all of the mix-ins are ready, I dump them into the bowl with the quinoa. I like to put "wet" ingredients in first, but that might be irrational. The quinoa, veggies and others are in the bowl on the right. On the left, we have the sauce.
One of the reasons I prefer this to your standard pasta salad is that mayonnaise-type dressings make me a little nervous. My host father was required to strictly avoid mayo and other cream-based sauces for health reasons, so there was never any question of using something like that at their house. You can put whatever kind of dressing you want on this salad. I make one using a mixture of olive oil and lemon juice. Once, I found a recipe on the internet that suggested 1/2 a cup of olive oil and 1/3 cup of lemon juice. For me, that was WAY too much lemon juice. I use probably more like 1/2 a cup of olive oil and 1 tbsp of lemon juice, though I'll admit that I don't measure anything and just look at the color when I mix it up in my little white bowl. While I think it's a good idea to mix up the sauce beforehand, if you need to adjust the ratios once it's already mixed with the salad, it's not a big deal. Just add whatever you need more of to the bowl, mix it up, and voila!
Thursday, April 12, 2012
The Fabulous Jewelry Wall
So, as you may have seen, I've been getting more into long necklaces lately. I've had a little difficulty figuring out where to store them. For several years now, I've stored my jewelry on a necktie rack I purchased for this purpose, and it's mounted on the wall above a towel rack in my master bathroom at the perfect height for all necklaces that are 20" or shorter. So, with my long necklaces, I'd been doubling them up. This "solution" was a loser for two reasons: the doubled up necklaces took up tons of space on the tie rack, and the doubled up necklaces got so terribly tangled up, it was difficult to wear them.
 Enter some mini command hooks as a solution! I had this little bit of wall between my bathroom and closet where I figured these necklaces could hang, out of the way, and not become tangled. I added a couple of pieces of decor.
 I recently made a trip to Hallmark where I picked up this adorable greeting card. That's also where I found the silver-tone word "Fabulous." It was meant to be a gift tag, probably left over from Christmas, so I got an awesome deal! The frame that I used for the card used to hold one of two pictures of me with my parents at my cousin's wedding. It wasn't really working, so stay tuned for an update on the new home for those!
 Here's another view of it. The solid white on the right edge is my (icky) white painted wood sliding closet door. I think this photo gives an idea of just how narrow this wall is. My master bathroom is to the left.
 And one parting shot from the bottom up. As the space is configured right now, it should hold 8 long necklaces, though I think I'll be able to add more hooks, and/or reposition the current ones, if I ever need more room!


Wednesday, April 11, 2012
An Unlovely Surprise
Earlier this spring, road work began in my neighborhood. At first, I was actually pretty pumped about it. My apartment building is located between a bridge and a little commercial area. The bridge, which crosses a little creek and associated biking and walking trails, needed to close so it could be removed and replaced. Awesome! While it's a little difficult for me to get north, to the other side of the creek, I rarely go that direction and the detours are very convenient. And, though I know the local businesses have struggled, traffic has really decreased with the bridge closed. Jaywalking became the norm!
Then came the noise. Jackhammers and more. And the jiggling of my huge apartment building. The first time I felt the building shake while I was sitting at my dining room table, I thought I might barf! It's not as thought it's an earthquake and it doesn't disrupt my bookshelves or things hanging on the wall. But still, this is Minnesota, where the ground doesn't shake.
I thought the noise was unpleasant. Things recently took another turn for the worse. ROAD WORK! Yeesh. Here's a view towards the creek:
 Yep. That's the street, with the crane in the background. All traffic has been routed to the west side of the street. Here's a view towards the neighborhood businesses:
 It's crazy bumpy to cross the gravel to get to the paved part - and there is a huge sewer cover in the middle of the lane which only recently got itself a safety cone to prevent unsuspecting passers-by from flattening their tires. It has a little bit of a Wild West feel, don't you think?
And then things took what is (hopefully) the last turn for the worse:
 Yep. That's a Port-A-Potty on the lawn at my apartment building. While I know the work crews need a place to use the facilities, I can't help but feeling a little like Hilly in The Help. One day I came home, saw this, and could only ask myself: "Why is there a toilet on my lawn?" At least I can be sure that this one is for a good cause!
PS: I hope you enjoy the photos in this post. I recently got the new Android Instagram App and decided to give it a whirl.
Then came the noise. Jackhammers and more. And the jiggling of my huge apartment building. The first time I felt the building shake while I was sitting at my dining room table, I thought I might barf! It's not as thought it's an earthquake and it doesn't disrupt my bookshelves or things hanging on the wall. But still, this is Minnesota, where the ground doesn't shake.
I thought the noise was unpleasant. Things recently took another turn for the worse. ROAD WORK! Yeesh. Here's a view towards the creek:


And then things took what is (hopefully) the last turn for the worse:

PS: I hope you enjoy the photos in this post. I recently got the new Android Instagram App and decided to give it a whirl.
Subscribe to:
Posts (Atom)