So, I know I haven't posted about a jewelry-making project in quite a while, but I've been busily working away nonetheless. Feast your eyes on these updates!
I found these sweet ombre beads not too long ago.
I snagged these guys at JoAnn's. I wasn't actually drawn to the purple at first - they had a number of colors that were all developed in ombre. There was a coral-y pink, and a teal-y blue that both caught my eye. But, for a long time I had been on the hunt for purple beads to make a purple necklace. I wear a lot of purple, so I knew I needed something in that family to complete my wardrobe.
I had encountered lots of bead choices in that middle purple shade displayed above, but that really was not what I was looking for. It was the darkest purple shade that sold me on these ombre bead sets. You can see, despite the color distortion in the photo, that I actually used all of the darkest purple beads and only a few each of the lighter shades when making my necklace. It doesn't exactly look like ombre from the front, but I'm pretty okay with that since it matches more of my purple clothes.
I also did a little bit of jewelry repair not long ago.
These earrings were part of a combo with a necklace that I bought at Charming Charlie. From the moment I saw them, I considered the possibility of replacing the earring hardware so that they would be lever-back rather than fish-hook style. That became not an option but a necessity when I got them home and removed them from the card. Though you can't see it super well in the photo above, there was silicone-type gel on the hooks that would not come off. EEK!
Lever-backs to the rescue!
So, here's the finished product: it's functional, since there's no solid goop preventing the hook from going through the hole in my ear, and its perfect for work since it's comfortable when answering the phone.
I also picked up these cool beads a while ago, with dreams of making a pink necklace to add to my collection.
I thought this shape would be just interesting enough that I could get away with a single strand of all the same bead.
And, since the pattern was so simple, making the necklace was a snap! It's already achieved favorite status, because even though the beads are large they are very light. They're like super shiny gumballs!
So that's it from the jewelry workshop for today. There'll be more soon, you can count on that!
Showing posts with label jewelry making. Show all posts
Monday, January 27, 2014
Friday, October 25, 2013
New pretties
One thing I've been up to recently is making some jewelry. It can be tough to get excited about finicky, tiny work like bending loops this way and that - the essentials of jewelry making. But, with the way my place is set up, I make jewelry at the kitchen table. Once I go through the hassle of bringing out the beading design board, and the 5 plastic boxes that hold all the supplies, I usually make more than one thing before packing them up again.
There were a couple of neat pieces I made recently!
I spotted these white beads quite a while ago - so long, I can't even remember which craft store! Ack! Anyways, I bought two strands of them and knew I wanted to make a necklace to keep. I was thinking I needed something that I could wear with my work clothes. I knew I didn't want black, but I was hoping for something versatile. I considered pearls, but I decided to go in a different direction.
It's not exactly a statement necklace, but it does add some volume with a scoop-necked dressy t-shirt. Since I only own about a dozen of those (almost wishing I were kidding...), I knew it would come in handy!
I also made another, longer necklace that was all about these pieces:
I found these sweet quatrefoil connectors when I went to the fancy bead store looking for the chain I needed to make the lighter-shaded tree necklace. I originally made this one with some extra thin jump rings, and then some of them came open the first time I debuted this necklace. The result was a tangle of doubled-up chain. But, with some diligent un-knotting, and some sad but necessary throwing away of perfectly good but totally screwed up chain, I was able to put together the finished product!
I'm pretty happy with how it turned out! The only bad news was that I wore it for the first time with this really pretty kelly green t-shirt... and then felt like I was the world's oldest Junior Girl Scout. Note to self: leave bright green + quatrefoil for the middle-schoolers and wear this one with any other color!
Friday, June 21, 2013
Tiny Blue
I'm sure you're tired by now of reading about my jewelry-making exploits... but there are more!
During my recent wandering at the Bead Monkey, I spotted this little doodad. I love this photo - because I got to make this flower several times larger than it is in real life. Even though I wasn't looking for a charm to make another necklace (you all know I can't resist a simple charm-and-chain combo), I couldn't pass it up at less than $2!
This is particularly true since it was all set for hardware. All I had to do was add a jump ring and slide it onto a chain. It took supplies of another dollar or two, combined with 5 minutes of my time...
And then I had this! Light blue and gold - what a fun combination for summer!
Thursday, June 13, 2013
The Tree
A few months ago, I went to lunch with my coworkers and we wound up at this fancy drugstore near our office. You've heard about adventures like this before - say, back when I bought myself a slap watch. Although I didn't have a budget, and although I really didn't have a need, I bought myself a necklace. It was a dark silver color and had a cut-out tree on it - definitely not fine jewelry! For $13, I left the shop a happy woman. I thought I was going to like it, and as time passed, I realized I had underestimated just how much I would like it. I wore it with work clothes and casual clothes, basically everywhere I went. I wore it so much I never even took a photo of it! But, thanks to the wonders of the internet, I found a link to a similar one on Amazon, if you want to see. Just imagine it in a darker color.

So, one night, I wore the tree necklace out to a social function and when I got home, I realized I didn't have it any more. I spent a couple of days double-checking my pockets, looking at the floor of my car in case it had fallen off while I was driving, but all to no avail. The tree necklace was gone.
After that, I started thinking about how to replace it. I went back to the fancy drugstore, but the tree necklaces were gone. I also did some internet research, but I hesitated. The necklaces I found for sale online were more expensive than the one I'd bought in person, and were going to be subject to shipping charges. Woof.
Then, I found myself in the jewelry making aisle at Michaels. I know I was looking for something else, though I can't remember what, when I found these.
I scooped up this card, which was not even $5, even though there was really only one charm of interest to me.
This one.
I took this little set home and got to work, combining the charm with chain, which I cut to size, adding the appropriate hardware to make it into a necklace.
I put it together quickly and was very satisfied with the result: a neat project that I'd made myself with a total materials cost of well under $10. Nice!
Over Memorial Day weekend, I happened to be out shopping at Patina, a boutique that sells gifts, stationery and jewelry. I was looking at the jewelry, curious to see if they might have a tree necklace of their own. That's when I spotted these!
I was soooooooooo tempted. I mean, come on, right? These are exactly like the charm on the necklace I had. Same style and everything. I ended up buying a housewarming present to give to a friend while I was shopping at Patina, so I decided it was imprudent to buy these as well.
Something else strange happened while I was at Patina, though. I ran into the nurse practitioner who works with my neurosurgeon! (I've had some pretty serious health issues that resulted in my having brain surgery back in December - you can read any details you want by clicking on the health label). It was so funny to see her outside the hospital. We chatted briefly and introduced each other to our shopping buddies and all was well. As we were about to part ways, the NP said to me, "We'll see you in a couple of weeks." That was the plan: after my diagnostic in early April and a good meeting with the surgeon in mid-April, I had decided that I was ready for my second round of brain surgery. I responded with, "He's not going on vacation during my surgery, is he?"
He was. The NP didn't know at that particular moment; she called me back a few days later and told me that they'd confirmed he wasn't going to be available. When the surgery had been scheduled several weeks before, she'd suggested that there was a "small chance" that the surgeon would be gone. I don't know why that date was offered to me even with that "small chance," because of course, now it has turned into a certainty. I had tried to be cautious about even announcing the date, but when they didn't call me to cancel, I just figured that he'd decided not to go on vacation. Since my first surgery in the fall was cancelled, I had some ideas about how to manage the stress, but it didn't work very well. After a few days of coordinating the three doctors on the team, we've picked a new date in early July. I think it is going to work out fine. But, as you can probably imagine, I basically lost it when my surgery was cancelled.
Answer? Shopping.
I still wasn't that excited about the tree earrings I'd seen at Patina. They were beautiful, but I don't like the wear such big earrings at work because I spend so much time on the phone. Then I had an epiphany! I figured that, if I could find the right supplies, I could actually turn the charm from the earrings into a charm for a necklace. Yay! The next weekend, I actually walked to a different Patina shop that's much closer to my apartment, and scored the earrings.
Then began the mad dash to find the right kind of hardware and chain to match this bright, matte, almost white-ish silver color. It took me quite a bit of searching, but I did find it eventually. I got the hardware above at Michaels. (Seriously. I think they know me there.)
And I got the chain at the Bead Monkey - an independent bead shop located at 50th and France in Edina. I've shopped there before, though this experience was a little bit different. I walked all over the store and looked at tons of interesting things. (I bought a few - stay tuned for more jewelry posts!) They had a display of chain, and I didn't see anything that was the perfect shade of bright, matte silver. I was just about to pay for the other things I'd found when I happened upon a display of sterling silver chains. This was one of them! I'd never worked with chain like this before - where there aren't links to hook the hardware on to. I spoke with the girl working at the time, who sold me the appropriate hardware and told me how to use it. She was completely right and it worked like a charm. I'm totally impressed! I also bought enough chain and hardware so that I could make a second necklace. After all, I have a second charm already and now I have a back up in case I lose the original!
Here I have my two finished tree necklaces - in metals for every mood!
Monday, May 6, 2013
The North Star
Last summer, while I was in Duluth on vacation with my family, I found this little gem in an antique shop.
I could tell from the moment I first picked it up that the chain was WAY too short - probably the right length for a child! I decided to buy it and bring it home, with the intention that I could put the charm on a new chain. It was the charm that really caught my attention - it's shaped like a coin, the design is subtle, and it reminds me of the North Star. For anyone who doesn't know, Minnesota's state motto is, in French, "The Star of the North." The necklace wasn't very expensive at the antique shop, but trust me, I wasn't thinking about the price!
I considered buying a spool of jewelry-making chain and creating the necklace with clasp findings I already had on hand. However, I've had poor luck recently with chain that is delicate, which is certainly what I was looking for. I took a look in a few different shops to see if I could buy a chain that was ready to go. At Wal-Mart (gasp!), in the jewelry-making supplies section, I discovered this 2 pack of chains that are 18" long. I also had seen several higher-quality sterling silver chains during my search, but I decided against that because I didn't want to have to take the tarnish off such a chain. I've had the charm for long enough that I know it's not sterling silver, so there was no imperative to make sure the metals matched. And I was leery about the price, this little duo was $3.00. Awesome!
I thought that transferring the charm to the new necklace wouldn't require anything but a little time. Instead, I wound up breaking out the jewelry-making tools and took the chance to add a length extender. Perfection!
Here's a close-up of the symbol, which is indented into the surface. You might also be able to see in this picture - on the left side - there's a hinge. It's a locket!
I pulled out the bin of scrapbooking supplies to see if there was anything there I could use to decorate the inside.
This is what I found!
So here's the view of the finished product, on the inside. I got to incorporate my "signature colors" but keep them out of sight. I suspect no one will even notice that its a locket!
Monday, November 26, 2012
Jewelry Workshop
Over the last few weeks, I've noticed a strange accumulation in my apartment. If you've been visiting my little corner of the internet, you might have noticed that I've been making more and more jewelry as this year has gone on. One little problem with the homemade jewelry is that it's less durable than what you might buy at a shop. The good news is that it's not hard to repair!
The storm cloud pearl necklace separated from its clasp. Unfortunately, this happened while I was at work, but at least the beads were totally contained on the strand.
. I grabbed my pliers and booked it back up. Good as new!
You might also remember that I made this very simple necklace with the single charm, engraved with the word "Believe." I wanted it to be on an especially fine chain. I was able to make a necklace that was really cute, but the thin chain was quite difficult to work with, even though it looked just right.The clasp fell off, I think because the hardware was too big for the links in the chain.
I made several attempts to get the hardware back on the chain, but ultimately, I think it was just too fine. I had some larger chain in my stash and ultimately realized it would be best to adjust my expectations and use it. It's great!
While I had all my tools out, I decided to work on a couple of other simple projects where I added a charm to a chain!
I found this cute little C charm at the Bead Monkey on a recent visit. I decided to add a couple of beads to give it a little more depth. I'm a little worried they're going to block the letter, but I thought I would give it a try.
I found this large rhinestone pave pendant at JoAnn as part of the Tori Spelling collection - yikes. I guess they recommend incorporating it with her other pieces to create a huge, loud necklace which just isn't really my style. But, given how much I like this pendant, I decided it was worth it to string it on a plain chain and just wear it by itself. I like it!
Though I procrastinated on making these repairs, I was sure proud when I stood up from the table: four "new" necklaces to put into rotation!
Wednesday, October 3, 2012
Believe
One thing that's made blogging a bit of a challenge over the last several weeks is that I'm dealing with the health issues that came up during my hospital stay. I'm happy to report that a lot of stuff that had previously been "up in the air" got nailed down last week. I'm going to have surgery on November 15. I'm a little nervous about it - and about getting the insurance company to cover it - but I feel so much better now that we've got a plan. Now that there's a destination, all I have to do is walk the path and follow the steps.
While I was in the hospital, I dreamed of getting out and visiting my local independent bead shop, the Bead Monkey. I'd stopped there earlier in the summer to get supplies for a project for a friend, and while I was trapped in the hospital, I wanted nothing more than to get out and go for a stroll. (I'm sure one of the reasons I was dreaming of this bead shop is that its just a stone's throw from the hospital, and by halfway through my stay, I really wanted to leave). While all of this uncertainty about my future treatments was pending, I made a stop at the bead store. I found this charm and knew right away that I had to have it:
This picture is definitely larger than life size! My next step was to find a chain so that I can wear this necklace whenever I need to have a little extra faith.
I bought the very finest diameter chain I could find at Michaels. I then got it home and struggled like a beast to get a jump ring through the end loop. And... it looked ridiculous!
Yeah - ick! Not the look I was really going for. So, back to Michaels I went, where I dug up some smaller jump rings. The bad news? I still had to struggle like a beast to get the smaller jump ring through the link on the chain. The good news? It's definitely less comical!
The easy part was adding the charm to the chain with another of these teensy jump rings. Here's the finished product!
And now, here I am, ready with a little extra dose of faith today!
Wednesday, August 1, 2012
The Charmed Life
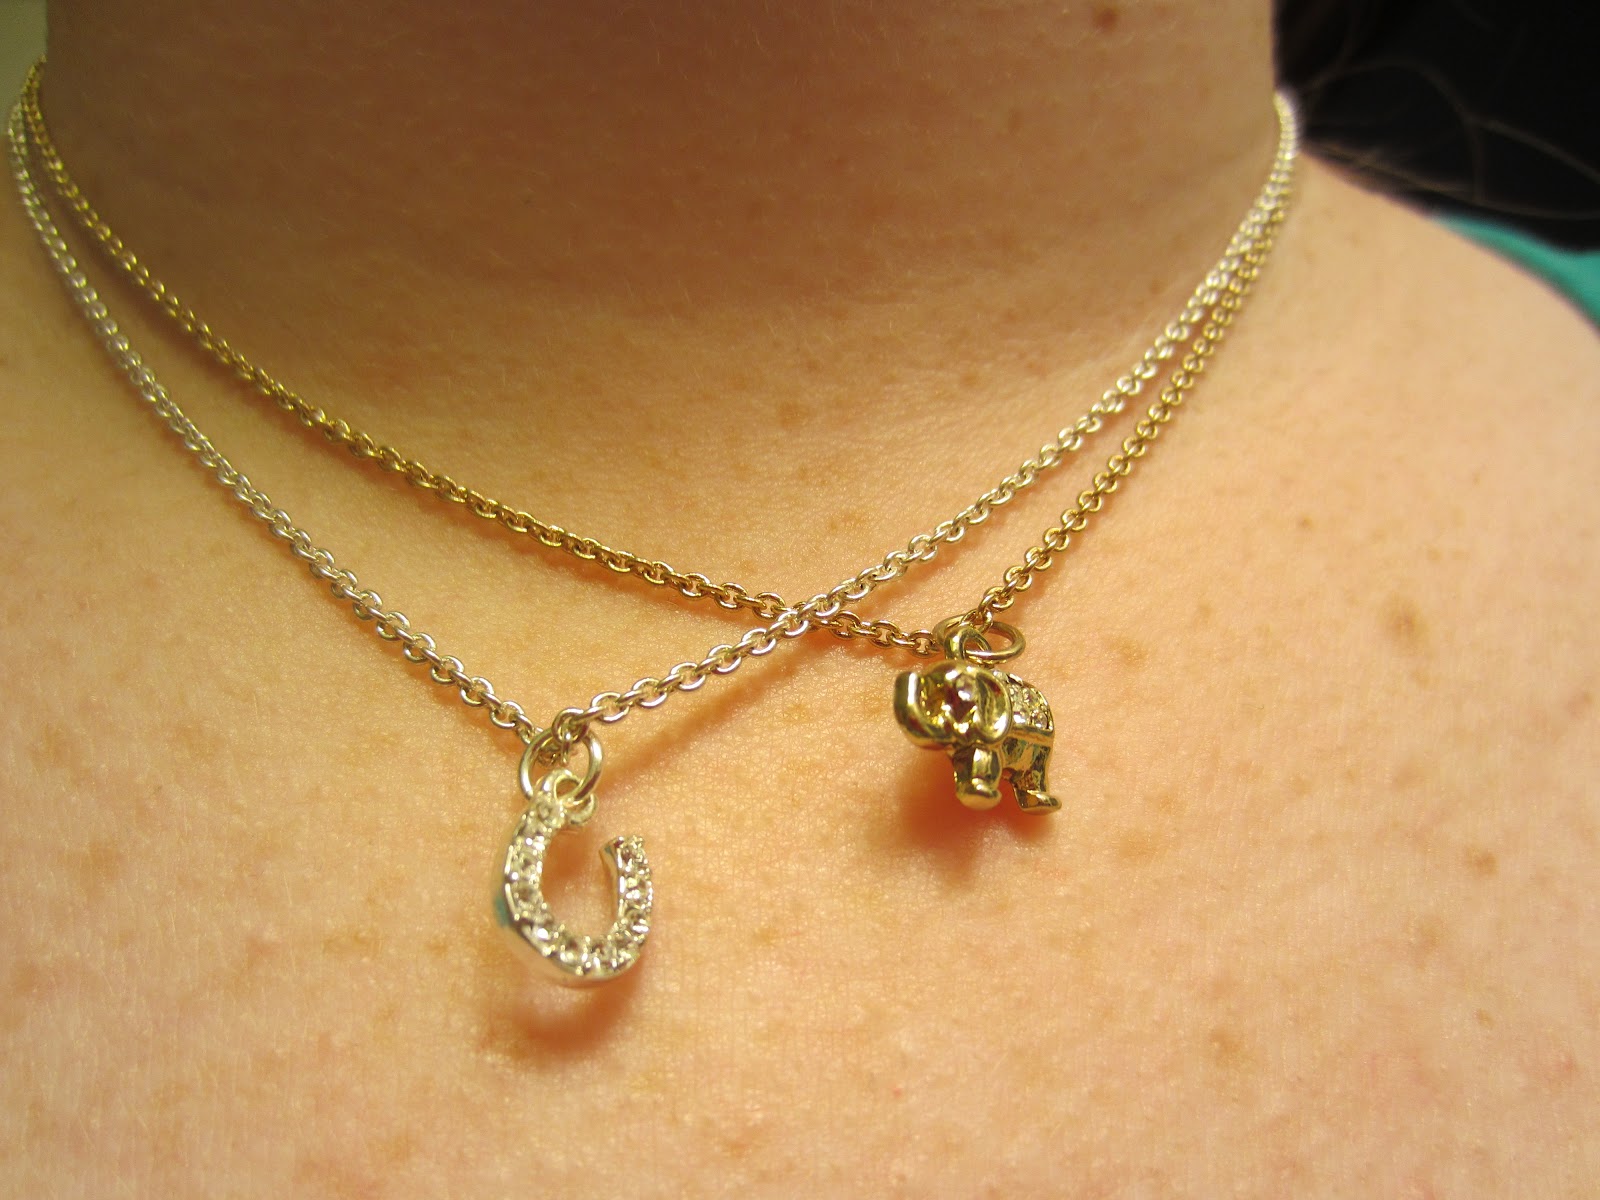
I know that trends in necklaces these days are mostly big "statement" pieces. While they're totally cool, I also love wearing plain chain necklaces with one small charm. They're comfortable and can be made to work with any neckline. Not long ago, I found this on clearance. Score!
It wasn't until I got home and ripped open the package that I realized this is actually ONE necklace. YIKES! Not only is it too short, with mixed metals (not my style!), the two strands seem to be constantly tangled with the charms spinning the wrong way. But look how adorable the charms are!
That's when I realized it was time to bust out the jewelry tools and supplies to see if I might improve things!
I cut the gold chain off the silver chain. I realized the gold chain was too short, so my only choice was to buy a spool at the craft store. In the picture above, I'm cutting it to the appropriate size using the silver feather necklace, which is one I know fits just right.
Here's the finished gold necklace. Because the clasp on the conjoined necklace was silver, I had to buy a gold (-colored) clasp to finish this off. I bought the thinnest chain I could find. Unfortunately, it's a little thicker than the chain on the conjoined necklace, but I think it works. Love this little elephant!
And now it's even the right length!
Next up was the silver necklace. The process was basically the same, again using the feather necklace as a guide to the length of the chain, because the chain from the conjoined necklace was also too short. The only part that was different was that I decided to reuse the clasp and extender chain that were part of the conjoined necklace. After a couple of snips with my wire cutters, they were free from the old necklace and I was able to attach them to the new one.
Here it is! Another necklace that's long enough to be comfortable and look nice with my clothing.
And here are the two finished products, successfully separated!
Wednesday, July 25, 2012
For once...
Today is a special day. It's Willow's birthday! And, for the first time since I met her in 2002, I'm ready in advance! I made her a necklace and sent it off last week. I hope she's already enjoying it. I thought I'd share a few pictures with you. Willow has always worn lots of jewelry and was doing statement necklaces before anyone else I knew. I figured I had to come up with something bold to fit in to her jewelry wardrobe. Looking at the finished product, I realize it's not as bold as some of her other things, but it's still probably the boldest thing I've made.
I found this cool pendant on a clearance shelf a couple of months ago and had to take it home with me. I knew it would be just right for Willow.
It took me a while to decide what kind of beads would complement this piece and work with Willow's style. It was a bit of a miracle when I ran across this collection of beads at JoAnn.
So, I laid them out on the design board to make sure they were centered.
I strung them onto beading wire and attached the clasps. Ta da!
And here's a quick close up of some of the beads, to give you a better sense of the color gradation:
I hope Willow likes it!
I made these birthday cards for Willow and Marigold, the other summer birthday among our group of college roommates. I bought the cards as part of a big pack earlier this year and then printed the messages with my computer and laser printed. Good work, Gartner Studios!
Subscribe to:
Posts (Atom)