Monday, December 30, 2013

My Merry Christmas

As Christmas begins to fade into the rear view mirror, I thought I'd take a moment to tell you that mine was lovely. There was a lot of craziness leading up to it - stay tuned for a post about that soon. But, by the time the day arrived, it was awesome. 

I was at the Marvelous house - where my parents live - beginning on Christmas Eve afternoon. We had a particularly yummy lunch, went to the movies, and got home tired and not hungry at all. I wrapped some of the remaining presents and soon after, tucked myself in! On Christmas morning, we slept in and then Mom made trail mix first thing. After that, we all helped to put together our traditional casserole and began opening our presents while it baked. 

One of the gifts I got from Mom was this little elf. Alone, he might seem a bit strange, but he isn''t when you consider the context! 

These three creatures (or sets of creatures, really) are previous gifts from Mom. Each Christmas when I was in college, we had a Christmas party in the dorms where the parents were instructed to send a gift from home. Each of the years, except the year I was abroad, Mom participated in this activity with a new soft Christmas decoration. Now the trio has become a foursome! 

Mom also presented me with this cute ornament - I especially love the asymmetrical star shape! 

She also picked out this winner for me - I'm so impressed with the painting!

I was also lucky enough to receive this pile of other lovely presents. I've got plenty to listen to, lots to watch, and even more to read. And who wants meatballs as we ring in the New Year? Me!!! 

This was also under the tree - an elf called Lucia! I actually picked her out for myself during a recent trip to St. Olaf - where else can you find an elf celebrating a Swedish holiday? (Yeah, she's like the St. Lucia from the books about Kirsten, the American Girl doll). She, too, makes more sense in context...

She's a perfect companion for the elf I already had, Kari, who is actually not just on display at Christmas time! With all of that said, for now, I'll wish you a Merry Christmas on behalf of myself and all of the elves!

Wednesday, December 25, 2013

Merry Christmas!

Well, after all the build-up, the big day is finally here!

I am spending the day with my family, opening presents, eating and relaxing. I hope you all are doing the same! I look forward to writing my recap, and reading yours, in the days to come. Merry Christmas!

Monday, December 23, 2013

DIY Ornaments... YES!

Okay, so on Friday, I told the story of how much of a disaster I encountered when I tried to paint the inside of glass bulbs with glitter paint. (Apparently, it's "super easy" to make them using glitter and floor wax. I heard that like 2 weeks after the fact. Boo hiss.) When I left you on Friday, I had thrown my project in the garbage, it was that much of a disaster.

But, off I repaired to the Bullseye. I exposed myself to some relatively serious risks of identity theft. Nevertheless, Target to the rescue!

Grabbed this multi-pack and fished out four gold ornaments!

Perfection! The next step was to grab the puffy paint that had always been part of the plan for this project.

I then grabbed some old yarn and made a drying cord in from of my living room window. Here they are wet...

... and here they are dry! Hard to tell the difference? Um, yeah. Puffy paint will do that to you! I was able to write "Um Ya Ya" on each ornament.

They have a lovely view of the snow drifting down!

I'd never actually made a plan as to how I was going to wrap up these ornaments to give as gifts. But, it didn't take too long to come up with a plan.

I just decided to display them! I got a less-offensive looking piece of yarn, hung it more tightly, and displayed the Um Ya Ya ornaments next to the coordinating red ornaments that came in the package from Target. When Marigold and Bluebell arrived, the ornaments were on display, so they weren't much of a "surprise," but it was fun that we got to enjoy all of them together during their visit!

Friday, December 20, 2013

DIY Christmas Ornaments... or not!

I decided just after I found out they were coming that I wanted to make ornaments as Christmas presents for Bluebell and Marigold. The three of us, and Willow (who was Bluebell's roommate and who now lives in New York) all know each othe
r because we went to St. Olaf College together. The bookstore on campus sells some Christmas ornaments bearing the school's cheer: Um Ya Ya. What does it mean? Not much of anything. Never the less, its the name of the school song and singing these words is an important part of the school song's chorus.

So, I decided to make these glass ball Christmas ornaments. My original vision was of glass ball Christmas ornaments, filled with glittering paint. I was inspired by lots of posts I had seen last year in the lead up to Christmas, when I was hanging around at home recovering from surgery. There wasn't a whole lot going on in my life, other than looking at photos of beautiful Christmas decorations. Here's an example, done by Jackie and her two little sons. I figured, if this is a project that can involve kids, how hard can it be? Hard.

I also snagged this paint to fill 'em up with. St. Olaf's school colors are black and gold, so I had this vision of glass balls, painted with sparkly gold on the inside, bearing Um Ya Ya on the outside in black letters with a black ribbon bow holding it up. What a dream... that was never to be.

I had my trusty Solo cups to catch paint dripping out of the bulbs. I had to cut off the top parts to present the ornaments from just falling all the way in.

So, here's the first draft of the first bulb I did. It's looking pretty much exactly how I had imagined, though this picture was taken before the bulb had even a full minute to start drying.

I acquired some different cups and got all four bulbs ready to go. This is before any of them had much of a chance to dry. That's pretty important, because once they started to dry, disaster struck.

Yuck.

Maybe I didn't use enough paint? Nope, it can't be that. Look at all of the paint that came out! I tried to do several "coats," by wiping up the paint left in the bottom of the cup with a sponge brush and dumping it back into the bulb. I then tilted the bulb to get full coverage and then let it dry before repeating the process again. I did that at least a half-dozen times. And still.

Barf. This got me thinking: glitter paint is actually a misnomer. Glitter paint is glue with lots and lots of glitter mixed in. The "glue" is usually clear - and that was the case with the gold glitter above. I'd been thinking I'd need to do several coats of glitter to get complete coverage. I had the idea that maybe a flat gold paint would help the situation, because it wouldn't just be particles - it could provide a little bit of coverage for behind the glitter.

So, back I went for more craft supplies. This project is such a good example of how easy it can be to throw more money at a craft if things are not turning out just the way you plan!

So here's one last shot of a bulb before the addition of the flat gold paint.

And here are the bulbs after the application of the first round of the flat gold paint. At this point, I was feeling pretty good! They've gotten a little brassier then I'd originally hoped, but they don't look totally gross. Yet.

And now they're starting to dry... and it's not pretty. It became more obvious with the addition of the flat paint that there was some glitter that had gotten on the outside of the ornament. I did so many "coats" of the glitter, this actually wasn't much of a surprise.

So, I busted out some handy alcohol wipes. They're the kind that can be used before inserting an IV, though I use them to clear my ear piercings, especially while traveling.

 Yeah, it really didn't help. This is bad.

 Worse.


 This one really emphasizes how poorly the glitter and the flat paint match. Ick.

Seriously! How did this happen??? Not one of these bulbs looks like anything anyone would ever want to display for any purpose. Except maybe Halloween.

I was becoming increasingly frustrated with my lack of progress on this project, because I had a bit of a deadline: the arrival of Marigold and Bluebell. I finally realized what I had to do.
Yeah, that's what you think it is. The time had come. These bulb ornaments were trash. Absolutely. But, don't despair! While I gave up on them, I didn't give up hope. Stay tuned for the rest of the story on Monday!

Wednesday, December 18, 2013

Scotties

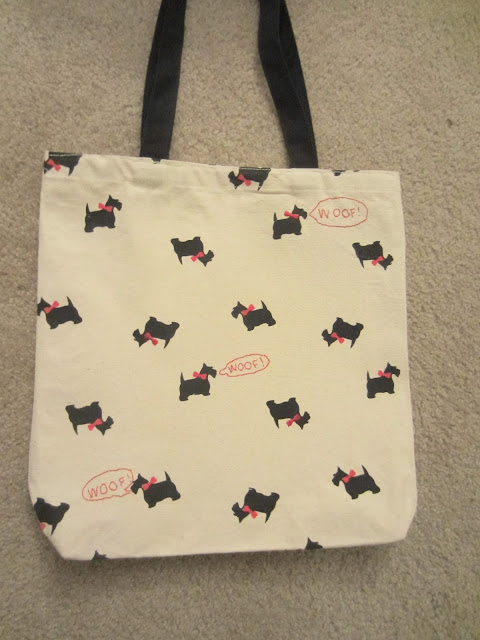
Isn't this adorable? 
I mean, come on, right? Scotties? Yeah! I actually saw this bag while I was wandering around Wal-Mart not long ago. Ultimately, restraint kicked in and I was able to leave it on the shelf. But, as more time passed, I realized that this would make a great gift for Bluebell. I went back to Wal-Mart and picked one up. 

Just after arriving home, I discovered this label. Yeesh. I wasn't really planning on washing it, and I didn't think Bluebell would have a huge need to wash it either. Who washes a tote bag? But, the more I thought about it, the more I became nervous about this. Does this mean that if it gets wet, the scotties will run off the bag in a black, liquid mess?

So, I did what any nut would do: I decided to immediately wash the bag. I mean, I'd rather have the scotties run down the drain in my sink than wind up staining Bluebell's clothes! 

Thankfully, no scotties were harmed in the washing of this tote bag. However, all of the wet areas were subject to that nasty browning shown in both of the pictures above. Also - the bag really stunk when wet. So weird! 

The great news, though, is that once the bag was dry, the problems disappeared! The smell and stains went away, though the bag had gotten pretty wrinkled when I washed it by hand. I busted out the iron and made quick work of that. 

I had the idea early on that I wanted to personalize the bag before giving it to Bluebell as a Christmas present. It took me a few iterations, but soon, I realized embroidery would be the thing! 

I grabbed the washable fabric pen and got drawing. I know it's a little hard the see in this photo, but I decided some of the scotties would be talking. Most were just barking, though one special scotty was going to say Bluebell's name! 

All that was left was to do the embroidery. I used the simplest stitch - the back stitch - to go over my drawn on design. Once the embroidery was done, I washed the stinky bag once again to get rid of the lingering blue marks. I had to pinch the fabric to get the right tension while stitching, so I actually had to iron the bag once more before it was ready to give (or to photograph). 

Of course, the words weren't totally perfect, and neither were the stitches. But, I'm still pretty happy with how it turned out! 

The best part is that Bluebell loved it too! At first, she didn't see the side that had her name on it, so she thought I'd bought it already embroidered. That was a pretty awesome compliment - especially because the work on this project (excluding drying time) took only a total of about 3 hours. It was awesome to personalize it for her! 

Monday, December 16, 2013

Paint up a little cheer

So, while Marigold and Bluebell were visiting from Michigan, we thought about making a craft project. We're all pretty into crafts of some kind, but not really the same kind. Bluebell has made some quilts, Marigold crochets, sews and makes other things especially with a hot glue gun, and I'm into the knitting and jewelry making. A common element? Not so much. This is why our crafts in the past have often involved pre-packaged ornament kits that create angels out of cotton balls and pipe cleaners. We made that one at least 5 years ago. It's so ugly I can't bear to display it, but so special I can't bear to throw it away. The "solution" is that the angel lives in the Christmas ornament box... 365 days a year.

This time, as I wandered the aisles at JoAnn, I was hoping we could find something to do that would manage to be both special and pleasing to look at. When we rounded the corner to the place where they keep the pre-packaged ornament kits (shudder...) we came upon some pretty cool ornaments!

We got some wood ones to paint on the outside, and some plastic bulb ones that we were primarily going to paint on the inside.

I described to the girls what kind of paint I had in my stash while we were standing there. We added a shade of green, since the mint I had at home wasn't going to cut it for Christmas, and a shade of hot pink.

Here's the reverse view of the spectrum. Bluebell decided to line them all up like ROY G. BIV so we could really get a feel. That's when I realized that my crafting might just be out of hand!

We got some Dixie cups at Target that were just the right size to drain the bulb ornaments once they'd been filled with paint and shaken.

I hung some yarn over the entrance to the kitchen to use as a drying line. I then proceeded to bump my head on each one of these ornaments. Nice.

And now, without further ado, I present the wooden ornaments I painted! (You'll have to stay tuned for an update on the bulb ornaments.)

First up, the birdie!
I noticed this bird mostly because it reminds me of one of my favorite ornaments my parents have for their tree. That bird is made of glass and has a bit of a gold "wash" effect to it - parts of the glass are still clear. I had in mind originally that I would give this bird a gold wash too. I started by painting it white, as a sort of primer, because the wood looked likely to be extra thirsty. Once I did the "wash" effect, I decided it was ugly. It's always touch and go with projects like these - will more paint really help? In this case, I figured it would. I got pretty lucky!

I also chose this little birdhouse. I don't really know what drew me to it - but once I picked it up, I couldn't put it down. I saw it as a beehive from the very first moment. What about a beehive says, Merry Christmas? Beats me. It was compulsive, but I love it. I'm very happy with how it turned out. You might not believe it, but the hole in the middle is actually 3D. I mean, there's a hole and an inside. And then I painted it all black. Now, even in person, it looks like its just a black dot. So crazy!

Finally, the most traditional of the ornaments: the sweet little tree. I was originally thinking of paining a red, scalloped garland. Then, I decided to use a toothpick as my paintbrush. All of a sudden, the chevron effect was born. I wish I'd used a brighter red, but the color I chose actually helps the white really pop. Couldn't be happier!

Welcome to Christmas, apparently the season of painted nonsense!